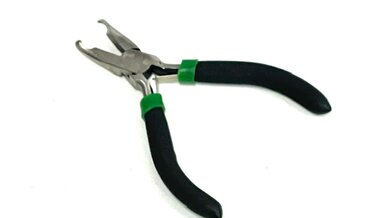
Installing steel threaded spark plugs in aluminum heads is risky business. If you are not careful it is easy to damage the fragile aluminum threads. In a few cases I have seen spark plugs blow out of their holes while the engine is running. And does that ever make a loud racket! Heavy handed mechanics often cross thread the plugs during a tune-up and you wont even know it until you go to replace the plugs at some later date.
How many times have we (and I am talking about myself here) done an oil change on our vehicle, looked at the odometer and said to ourselves, I will write the mileage down later. I know that I have even tried to memorize the mileage, only to discover a couple months down the road that I am asking myself, Was that 82 or 83 thousand miles?
Older Mercedes have a very effective emergency brake design which was virtually the same on all models from the late 1960's right up through the early 1990's. The actuating mechanisms are all mechanical and are controlled by a Y cable under the car. This cable is pulled by either a hand or foot operated lever.
This manual is part of our new Advanced DIY Mechanic Series. It covers advanced procedures in simple terms with photos to illustrate every step. The format size is 8.5 x 7 inches. It is printed on 28 pound stock paper and is wire bound to allow it to stay open when on your workbench. The plastic protective cover will help to minimize grease and smudges when carrying it.
For all 108, 109, 114, 115, 107, 116, 123, 126, 201, and 124 chassis from 1965 to 1995. I wrote this repair guide to show you how to properly remove your instrument cluster and replace worn or failing components.
This $25 gift certificate can be used up to one year from date of purchase to be applied toward the purchase any item or items on our website . The certificate will be mailed with an individual certificate number for identification purposes. All the recipient needs to do with it is call in with his order and give us the certificate number.
If you desire a certificate greater than $25.00 can order more than one of these (in $25 increments) or you can call 800-513-5797 with any specific amount you want. This is a great gift to give to a Mercedes enthusiast. There is no charge for mailing a certificate.
SKU: COM-GFTCRTThis repair guide covers all 114 and 115 chassis Mercedes sedans built from 1968 to 1976. Removing a 114/115 chassis door panel and doing related door maintenance and repair are all fairly easy jobs for the do-it-yourselfer. If you have not removed a door panel before, there are a few pitfalls. This guide will take you step by step on how to properly remove the door panels without damaging them.
Fits all chassis: 107, 114, 115, 116, 123, 126, 201 and 124. This repair manual is written for all Mercedes models from the early 1970s up to the later 1980s. Principles may apply to older pre 1970 chassis as well but most instructions and illustrations are written for the chassis numbers listed above. Is your drivers seat starting to sag more than it use to? Are you finding it is just not comfortable any more on long trips? Maybe it tips to one side and you are constantly trying to compensate your weight to other side. This manual will show you how you can remove and repair the seat yourself using original Mercedes used parts.
FITS THE FOLLOWING: 114, 115, 107, 123 and 126 to 1985 chassis Mercedes that use the rear axles with the crimped sealed cans over the flex joints (spider). Mercedes rear axles of the 1970's and 1980's are extremely robust. I have seen them go over 400,000 miles with no adverse wine and with their original axle boots still in place.
But as these cars age, I am seeing more problems with axle boot deterioration and axle joint failure. This manual will cover the procedures for removing and installing the axle assemblies, options for repair or replacement, and detailed instructions on how to replace the boots.
Can be used to log maintenance on all Mercedes, PON FIN P55 Pre 1960, 190SL, 110, 111, 112, 113, 114, 115, 108, 109, 107, 116, 123, 126, 201, and 124 chassis. Each of these is a shortened version of our regular maintenance logbook which contains 20 two page entry forms which is enough for 60,000 miles of driving. We are offering this logbook in a 3 pack for those of you who have multiple Mercedes. You know these log books can even be used with other cars with slight modification. At least you will have a detailed record no matter what vehicle you are working on!
Applies to all Mercedes: Pre 1960, 190SL, 110, 111, 112, 113, 114, 115, 108, 109, 107, 116, 123, 126, 201, and 124 chassis. I have been trying to find a lasting solution to rust problems on old cars ever since 1962. That was when I purchased a 1934 Ford Sedan and brought it home to fix up and drive. I was only 15 at the time, but I certainly did not find the rust holes very attractive in the lower front and rear quarter panels.
For all 114/115 chassis cars with vacuum door locks built from 1968 to 1976. Now you can finally fix those pesky vacuum door locks yourself! Failure is almost always caused by vacuum leaks in the system. This 28 page manual with 55 photographs will take you step by step through the process of quickly finding and repairing those leaks.
Starting at the firewall and working all the way to the trunk/deck of your car, I will show you how to isolate the problems even without having to take the door panels off.
To aid in trouble shooting you will need to acquire an inexpensive vacuum hand pump. Normal hand tools are the only other things you will need.
For all 111, 112, 108, 109, 114, 115, 107, 116, 123, 126 and 201 chassis (Non tilting roofs up through 1986). Do you have a power sunroof that is working poorly or maybe not at all? Does it move slowly or not at all in the morning, but when it heats up during the day it works just fine? Do you have to assist it by hand to get it fully opened or closed? This 28 page guide with 46 pictures with help you fix those problems. It contains information that you will not see in any other manual. I will take you step by step through all the procedures you'll need to go through to get your electric sunroof working properly again.